
React-Router6 简单分析实现
前文讲述了前端路由的实现已经 react-router@4 一些组件的实现。最近笔者公司在升级 react-router@6 因此本文将对 react-router@6 的一些实现做分析。
React-Router 的架构
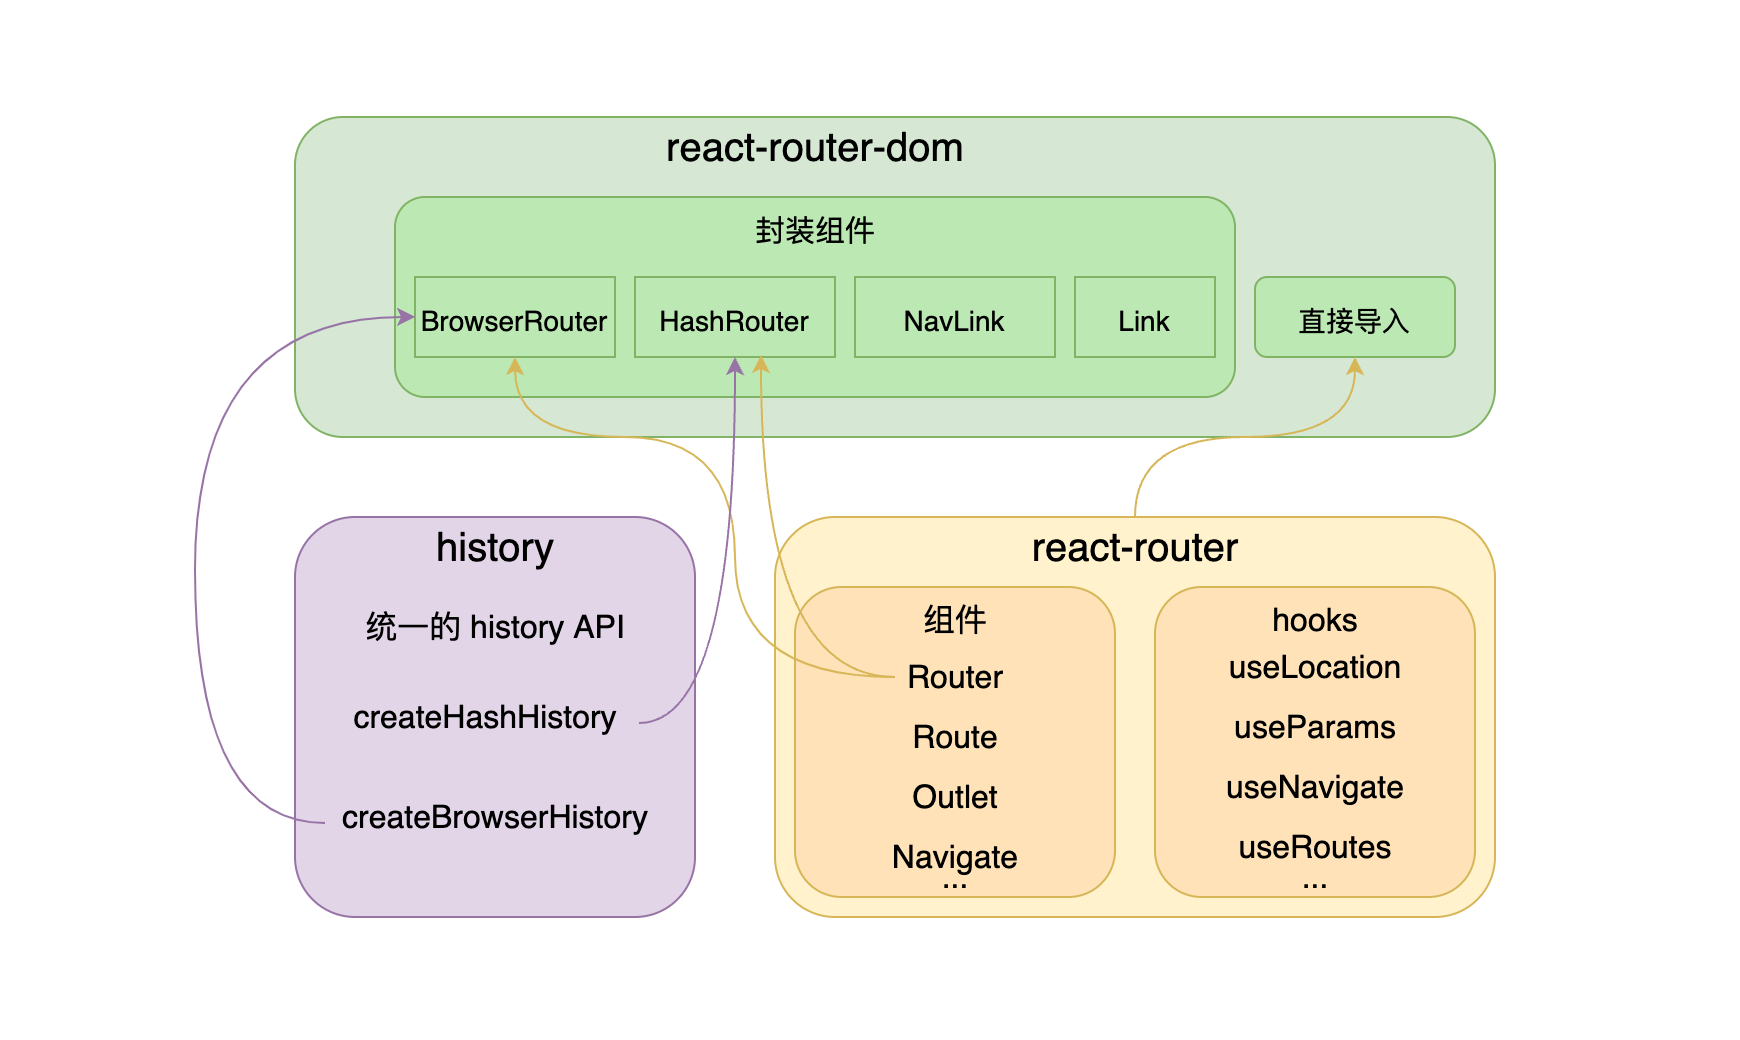
- history 库给 browser、hash 两种 history 提供了统一的 API,给到 react-router-dom 使用
- react-router 实现了路由的最核心能力。提供了
<Router>、<Route>等组件,以及配套 hook - react-router-dom 是对 react-router 更上一层封装。把 history 传入
<Router>并初始化成<BrowserRouter>、<HashRouter>,补充了<Link>这样给浏览器直接用的组件。同时把 react-router 直接导出,减少依赖
History 实现
实现查看前文
React-Router@6 丐版实现
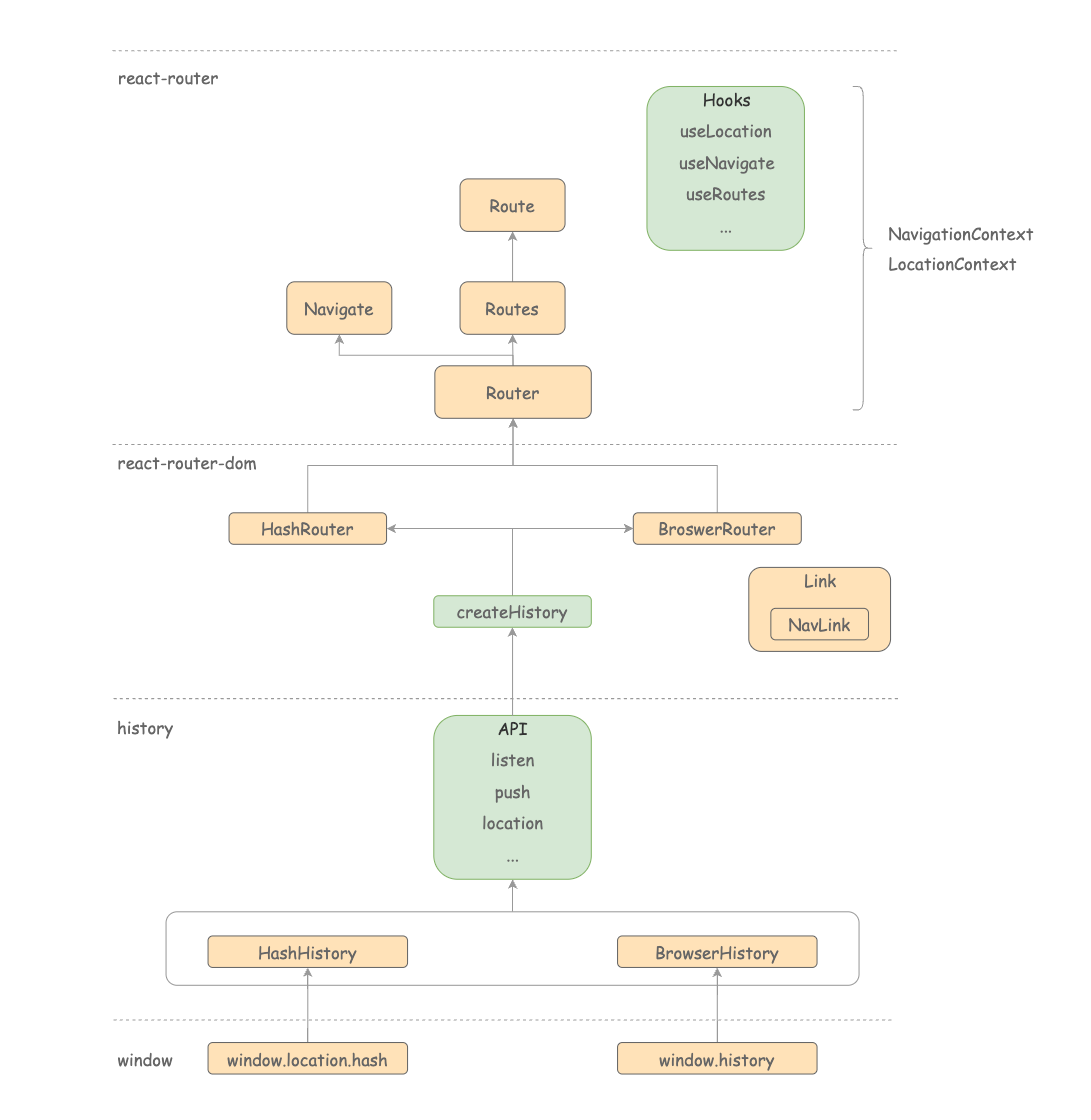
Router
Router 做的事情很简单,接收navigator 和location,使用 context 将数据传递下去,能够让子组件获取到相关的数据
function Router(props: IProps) {
  const { navigator, children, location } = props;

  const navigationContext = React.useMemo(() => ({ navigator }), [navigator]);

  const { pathname } = location;

  const locationContext = React.useMemo(
    () => ({ location: { pathname } }),
    [pathname],
  );

  return (
    <NavigationContext.Provider value={navigationContext}>
      <LocationContext.Provider value={locationContext} children={children} />
    </NavigationContext.Provider>
  );
}
HashRouter
基于不同的 history 调用 Router 组件。并且在 history 发生改变的时候,监听 history,能够在 location 发生改变的时候,执行回调改变 location。
在下面的代码中,能够发现监听者为 setState 函数,在上述 hashHistory 中,如果我们的 location 发生了改变,会通知到所有的监听者执行回调,也就是我们这里的 setState 函数,即我们能够拿到最新的 location 信息通过 LocationContext 传递给子组件,再去做对应的路由匹配
function HashRouter({ children }) {
  let historyRef = React.useRef();
  if (historyRef.current == null) {
    historyRef.current = createHashHistory();
  }
  let history = historyRef.current;
  let [state, setState] = React.useState({
    location: history.location,
  });

  React.useEffect(() => {
    const unListen = history.listen(setState);
    return unListen;
  }, [history]);

  return (
    <Router children={children} location={state.location} navigator={history} />
  );
}
Routes/Route
我们能够发现在 v6.0 的版本 Route 组件只是一个工具人,并没有做任何事情。
function Route(_props: RouteProps): React.ReactElement | null {
  invariant(
    false,
    `A <Route> is only ever to be used as the child of <Routes> element, ` +
      `never rendered directly. Please wrap your <Route> in a <Routes>.`,
  );
}
实际上处理一切逻辑的组件是 Routes,它内部实现了根据路由的变化,匹配出一个正确的组件。
const Routes = ({ children }) => {
  return useRoutes(createRoutesFromChildren(children));
};
useRoutes 为整个 v6 版本的核心,分为路由上下文解析、路由匹配、路由渲染三个步骤
<Routes>
  <Route path="/home" element={<Home />}>
    <Route path="1" element={<Home1 />}>
      <Route path="2" element={<Home2 />}></Route>
    </Route>
  </Route>
  <Route path="/about" element={<About />}></Route>
  <Route path="/list" element={<List />}></Route>
  <Route path="/notFound" element={<NotFound />} />
  <Route path="/navigate" element={<Navigate to="/notFound" />} />
</Routes>
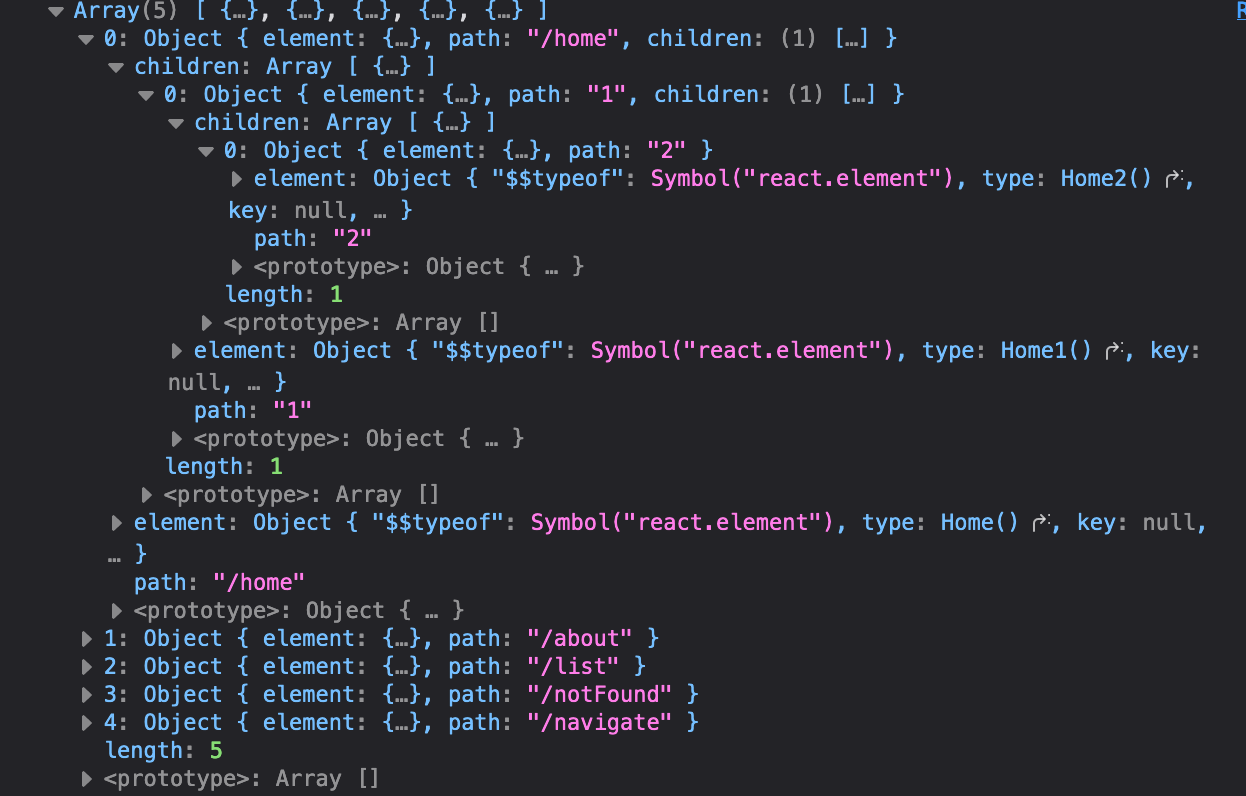
上述 Routes 代码中,通过 createRoutesFromChildren 函数将 Route 组件结构化。可以把 <Route> 类型的 react element 对象,变成了普通的 route 对象结构,如下图
useRoutes
useRoutes 才是真正处理渲染关系的,其代码如下:
// 第一步:获取相关的 pathname
let location = useLocation();
let { matches: parentMatches } = React.useContext(RouteContext);
// 第二步:找到匹配的路由分支,将 pathname 和 Route 的 path 做匹配
const matches = matchRoutes(routes, location);
// 第三步:渲染真正的路由组件
const renderedMatches = _renderMatches(matches, parentMatches);

return renderedMatches;
matchRoutes
matchRoutes 中通过 pathname 和路由的 path 进行匹配
因为我们在 Route 中定义的 path 都是相对路径,所以我们在 matchRoutes 方法中,需要对 routes 对象遍历,对于 children 里面的 path 需要变成完整的路径,并且需要将 routes 扁平化,不在使用嵌套结构
const flattenRoutes = (
  routes,
  branches = [],
  parentsMeta = [],
  parentPath = '',
) => {
  const flattenRoute = (route) => {
    const meta = {
      relativePath: route.path || '',
      route,
    };
    const path = joinPaths([parentPath, meta.relativePath]);

    const routesMeta = parentsMeta.concat(meta);
    if (route.children?.length > 0) {
      flattenRoutes(route.children, branches, routesMeta, path);
    }
    if (route.path == null) {
      return;
    }
    branches.push({ path, routesMeta });
  };
  routes.forEach((route) => {
    flattenRoute(route);
  });
  return branches;
};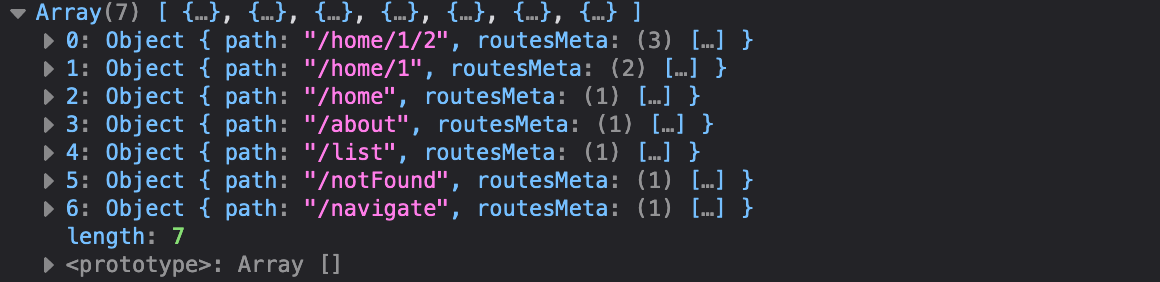
当我们访问/#/home/1/2的时候,获得的 matches 如下

我们得到的 match 顺序是从 Home → Home1 → Home2
_renderMatches
_renderMatches 才会渲染所有的 matches 对象
const _renderMatches = (matches, parentMatches = []) => {
  let renderedMatches = matches;
  return renderedMatches.reduceRight((outlet, match, index) => {
    let matches = parentMatches.concat(renderedMatches.slice(0, index + 1));
    const getChildren = () => {
      let children;
      if (match.route.Component) {
        children = <match.route.Component />;
      } else if (match.route.element) {
        children = match.route.element;
      } else {
        children = outlet;
      }
      return (
        <RouteContext.Provider
          value={{
            outlet,
            matches,
          }}
        >
          {children}
        </RouteContext.Provider>
      );
    };
    return getChildren();
  }, null);
};
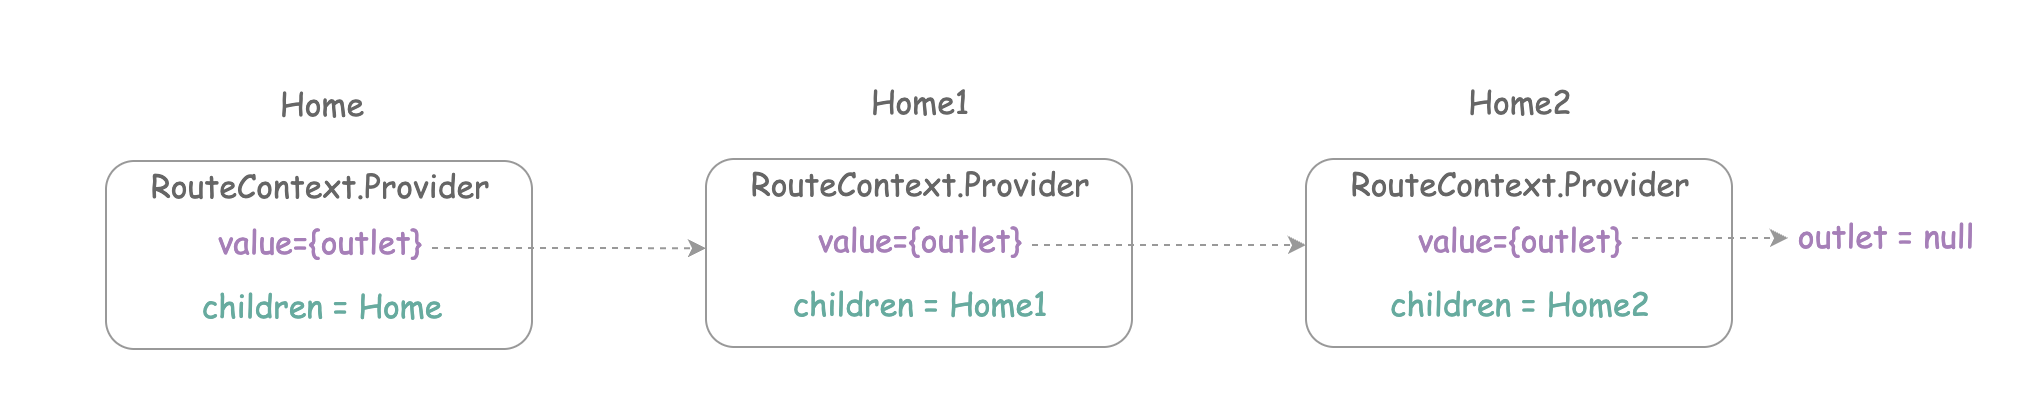
_renderMatches 这段代码我们能够明白 outlet 作为子路由是如何传递给父路由渲染的。matches 采用从右往左的遍历顺序,将上一项的返回值作为后一项的 outlet,那么子路由就作为 outlet 传递给了父路由
Outlet
实际上就是内部渲染 RouteContext 的 outlet 属性
function Outlet(props) {
  return useOutlet(props.context);
}

function useOutlet(context?: unknown) {
  let outlet = useContext(RouteContext).outlet; // 获取上一级 RouteContext 上面的 outlet
  if (outlet) {
    return (
      <OutletContext.Provider value={context}>{outlet}</OutletContext.Provider>
    );
  }
  return outlet;
}
Link
在 Link 中,我们使用<a>标签来做跳转,但是 a 标签会使页面重新刷新,所以需要阻止 a 标签的默认行为,调用 useNavigate 方法进行跳转
function Link({ to, children, onClick }) {
  const navigate = useNavigate();

  const handleClick = onClick
    ? onClick
    : (event) => {
        event.preventDefault();
        navigate(to);
      };

  return (
    <a href={to} onClick={handleClick}>
      {children}
    </a>
  );
}
Hooks
function useLocation() {
  return useContext(LocationContext).location;
}

function useNavigate() {
  const { navigator } = useContext(NavigationContext);

  const navigate = useCallback(
    (to: string) => {
      navigator.push(to);
    },
    [navigator],
  );
  return navigate;
}