
通过 Figma 插件实现 Icon 自由
创建与使用 Plugin
由于我们的 plugin 需要做一些交互的操作,选择使用 React 做为交互层的框架,通过 figma-plugin-react-template 初始化一个 plugin;或者使用 Webpack + React + TypeScript 手动配置一个项目即可。
如果是手动配置项目的话,需要创建 manifest.json 文件
{
  "name": "My Figma Plugin",
  "id": "my-figma-plugin",
  "api": "1.0.0",
  "main": "dist/code.js",
  "ui": "dist/ui.html",
  "editorType": ["figma"]
}
通过编译代码 webpack --mode=development --watch 之后
- 选择
Plugins→Development→Import plugin from manifest... - 选择
manifest.json并运行插件
可以实现实时更新
代码实现
需求分析
UI 小姐姐说,我只想对一个手指头,这些 icon 都能用了!
- 将 figma 上的 icon svg 全部提取出来,转换成为 React 代码
- 创建 gitlab commit 提交代码
- gitlab ci 直接发包
需求规划
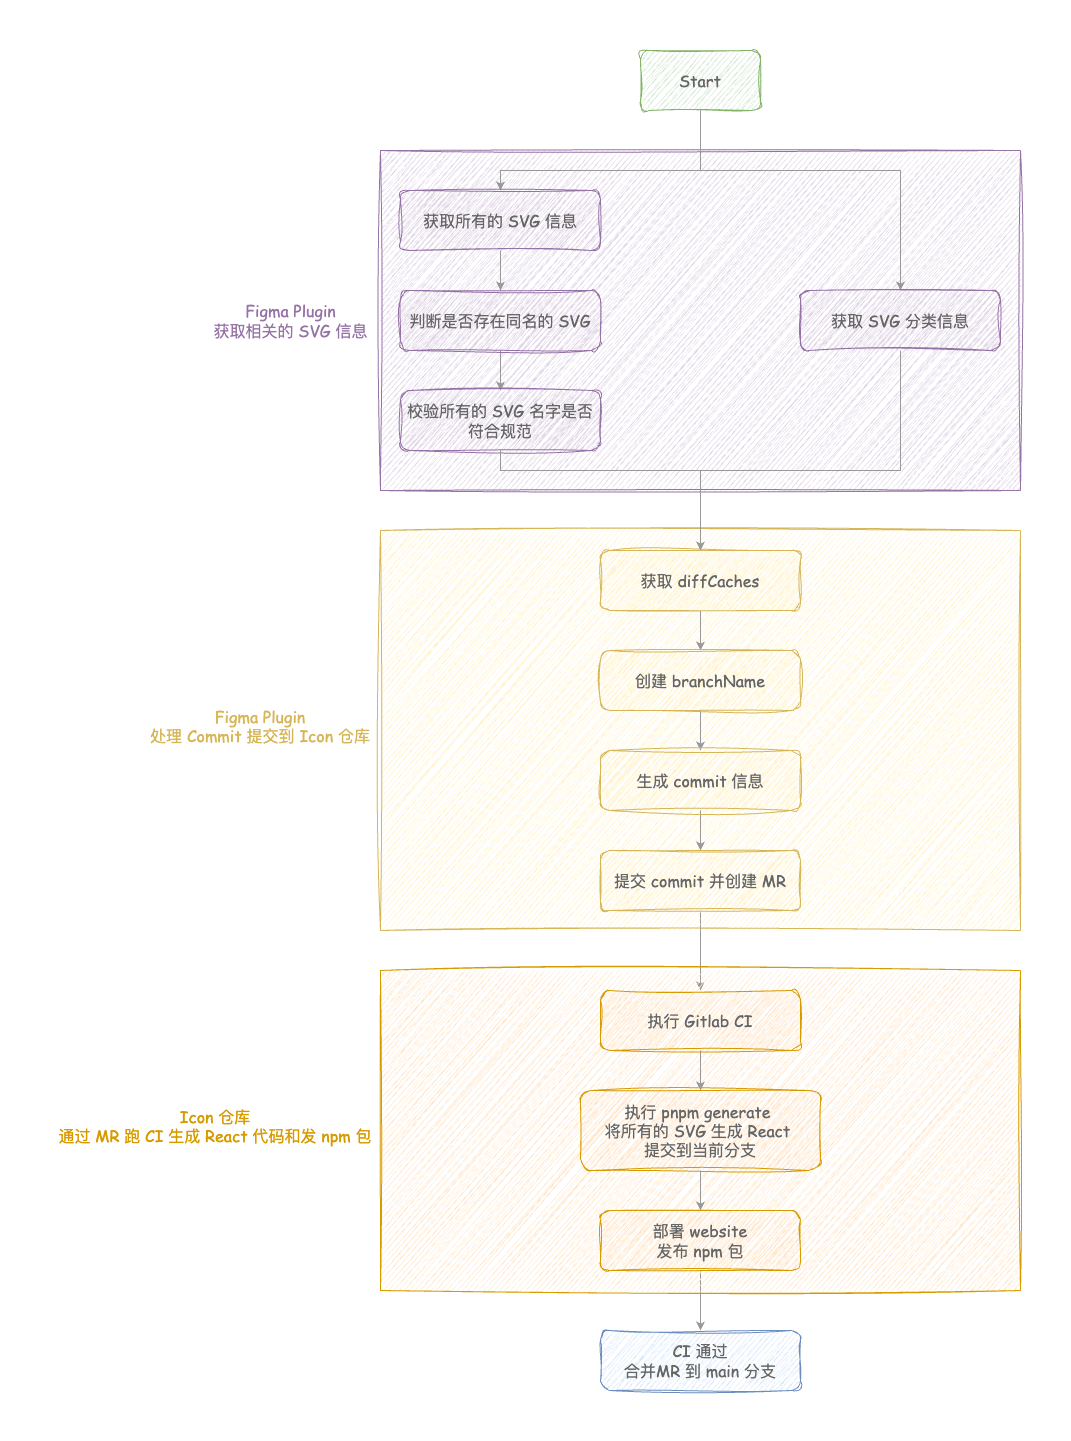
- Plugin 仓库,完成 Figma 上的操作
- Icon 仓库,Figma 上获取到的信息全部提交到该仓库,发包和网站部署都在该仓库
需求实现
对于 Figma 来说必须满足以下条件,Page 以 Icon 命名,里面的 Frame 必须是
outlined | filled | colored结尾,每一个 Frame 下的内容如果需要分类展示,Text+Icons 合集必须同属于一个 Frame
对于 Figma 插件来说分为两个线程,一个主线程一个 UI 线程,两个线程之间需要使用 postMessage 通信,具体可点击查看
1. 通过 Figma 获取 SVG 信息
1.1 深度遍历 figma.root 找到我们需要 iconNode,组合相关信息
export const getAllIconsFromFigma = (data: DocumentNode) => {
  const components: IComponentType = {};

  // find icon pages
  const iconPages = data.children.filter(
    (d) => /icon/i.test(d.name) && d.type === 'PAGE',
  );

  if (iconPages.length === 0) {
    throw Error('至少查看一个名称包含“icon”的页面');
  }

  // find icon frames
  const iconFrames: FrameNode[] = iconPages
    .reduce<SceneNode[]>((all, cur) => all.concat(cur.children), [])
    .filter(
      (d): d is FrameNode =>
        /(outlined|filled|colored)$/i.test(d.name) && d.type === 'FRAME',
    );

  if (iconFrames.length === 0) {
    throw Error("至少检查一个以 'outlined' | 'filled' | 'colored' 结尾");
  }

  const check = (c: SceneNode, iconType: string) => {
    if (c.type === 'COMPONENT') {
      const { name, id } = c;

      components[id] = {
        name,
        componentName: `${name}${iconType}`,
        id,
        origin: c,
        svg: undefined,
      };
    }
    if ('children' in c) {
      c.children.forEach((item) => check(item, iconType));
    }
  };

  iconFrames.forEach((item) => check(item, getIconType(item.name)));

  if (Object.values(components).length === 0) {
    throw Error('没有组件!');
  }
  return components;
};
1.2 判断所有图标是否存在重复命名
所有图标的命名为 iconName+type
const filterDuplicatedComponents = (components: IComponentType) => {
  const componentMap = new Map<string, IComponent[]>();

  // 按 componentName 分组
  Object.values(components).forEach((component) => {
    const key = component.componentName.toLowerCase();
    componentMap.set(key, [...(componentMap.get(key) || []), component]);
  });

  // 只返回重复的组件信息
  return Array.from(componentMap.entries())
    .filter(([_, components]) => components.length > 1)
    .flatMap(([_, components]) =>
      components.map((c) => `${c.name} in ${c.origin.type}`),
    );
};
1.3 判断 icon 命名是否规范
必须以大写字母开头,后面必须至少有一个字母或数字,不能包含特殊字符、空格等
export const isComponentsNameStandard = (components: IComponentType) => {
  const nonStandardComponents = Object.values(components)
    .filter((d) => !/^[A-Z][0-9a-zA-Z]+$/.test(d.name))
    .map((d) => d.name);

  if (nonStandardComponents.length > 0) {
    throw Error('名字不符合规范:' + JSON.stringify(nonStandardComponents));
  }
  return components;
};
1.4 获得 svg 的代码
使用 node.origin.exportAsync 导出矢量图
const serialize = async (node: IComponent) => {
  const svg = await node.origin.exportAsync({ format: 'SVG' });

  return {
    name: node.name,
    id: node.id,
    componentName: node.componentName,
    svg,
  };
};
2. 整合 commit 创建 MR
2.1 diffCaches
每次提交的时候会创建 cache.json,存储
{
  "3009:8579": {
    "componentName": "LeftCircleFilled",
    "tag": "5d2584f13a770ff6727ea82862f17aa0"
  },
  "3009:8586": {
    "componentName": "RightCircleFilled",
    "tag": "b982a63398d1f1e4d517ac3c441c8626"
  }
}
key 为每一个 figma 组件的唯一 ID,tag 是每一个 svg 生成的 md5 信息。
将这次提交和之前的提交的 cache 做一个对比,获得更改的 svg
export const diffCaches = (prev: IDiffCaches, current: IDiffCaches) => {
  const results: IDiffResult[] = [];
  Object.keys(current).map((svgId) => {
    // 之前没有的为 新增
    if (!prev[svgId]) {
      results.push({
        id: svgId,
        action: 'create',
        componentName: current[svgId].componentName,
      });
    }
    // 唯一标识所代表的 svg 发生改变,删除再创建
    else if (prev[svgId].componentName !== current[svgId].componentName) {
      results.push({
        id: svgId,
        action: 'delete',
        componentName: prev[svgId].componentName,
      });
      results.push({
        id: svgId,
        action: 'create',
        componentName: current[svgId].componentName,
      });
    }
    // tag 不一致,说明 svg 发生更改为 更新
    else if (prev[svgId].tag !== current[svgId].tag) {
      results.push({
        id: svgId,
        action: 'update',
        componentName: current[svgId].componentName,
      });
    }
  });
  // 遍历prev,prev 中有的,curr 没有为 删除
  Object.keys(prev).map((svgId) => {
    if (!current[svgId]) {
      results.push({
        id: svgId,
        action: 'delete',
        componentName: prev[svgId].componentName,
      });
    }
  });

  return results;
};
🤔 为何要做 diff 操作
1.减少后续提交的文件
2.不用通过 delete commit 删除现有的 svg
2.2 创建新的分支
每次操作都创建一个临时分支,通过 gitlab 的 API 创建
获取当前分支的 package.json 的 version 字段,做更新
2.3 整合 commit 信息
更新 package.json/cache.json/website/src/constant/index.ts 以及 diff 出来的内容
通过 gitlab API 提交到新创建的分支
const commits = [
  {
    action: 'update',
    file_path: `package.json`,
    content: JSON.stringify(packageJson, null, 4),
  },
  {
    action: 'update',
    file_path: 'cache.json',
    content: JSON.stringify(currentCaches, null, 4),
  },
  {
    action: 'update',
    file_path: 'website/src/constant/index.ts',
    content: `export default ${JSON.stringify(categoryHierarchy, null, 4)}`,
  },
].concat(
  diffResults.map((item) => {
    const component = components.find((component) => component.id === item.id);
    return {
      action: item.action,
      file_path: `src/svg/${item.componentName}.svg`,
      //@ts-ignore
      content:
        item.action === 'delete'
          ? undefined
          : new TextDecoder().decode(component.svg),
    };
  }),
);

await createCommits(commits, branchName);
2.4 创建 MR 等待合并
创建 MR 到 main 分支,等待 CI
😢 创建完成 MR 之后,无法直接合并,所有的 MR 都会有一个 check 的操作,这个时候直接提交会报错 405
const { iid } = await createMergeRequest(
  `[figma]: update to ${packageJson.version}`,
  mrMessage,
  branchName,
);

await waitForMergeRequestReady(iid);

export async function waitForMergeRequestReady(
  mergeRequestId,
  maxAttempts = 50,
) {
  const checkStatus = async (attempt = 0): Promise<void> => {
    if (attempt >= maxAttempts) {
      return Promise.reject('等待 MR 就绪超时');
    }

    const mrStatus = await getMergeRequestStatus(mergeRequestId);

    if (mrStatus.has_conflicts) {
      return Promise.reject('MR 存在冲突,请手动解决');
    }

    if (mrStatus.merge_status === 'cannot_be_merged') {
      return Promise.reject('MR 无法合并,请检查是否存在问题');
    }

    if (mrStatus.head_pipeline && mrStatus.head_pipeline.status !== 'success') {
      if (mrStatus.head_pipeline.status === 'failed') {
        return Promise.reject('Pipeline 执行失败,请检查问题');
      }

      await new Promise((resolve) => setTimeout(resolve, 8000));
      return checkStatus(attempt + 1);
    }

    if (mrStatus.merge_status === 'can_be_merged') {
      return;
    }

    await new Promise((resolve) => setTimeout(resolve, 8000));
    return checkStatus(attempt + 1);
  };

  return checkStatus();
}
3. MR CI 执行
3.1 执行 pnpm i 安装项目和 website 的依赖
3.2 执行 pnpm generator 将 svg 转为 react 代码并提交到当前分支
使用 SVGO 优化 SVG,对于非 colored 的 svg,移除 fill 属性并且添加 { fill: 'currentColor' } 属性
const optimizeSvg = (svgCode, iconType) => {
  if (iconType === 'colored') {
    return svgCode;
  }
  const result = optimize(svgCode, {
    plugins: [
      {
        name: 'removeAttrs',
        params: {
          attrs: ['fill'],
        },
      },
      {
        name: 'addAttributesToSVGElement',
        params: {
          attributes: [{ fill: 'currentColor' }],
        },
      },
    ],
  });

  return result.data;
};
对 svg 中的内容做一些特殊处理,所有的 svgReact 使用 span 包裹增加相关的样式,支持 disabled, hoverable, active, size, color 等属性
const convertToReactComponent = (svgCode, componentName, iconType) => {
  // 提取 svg 内容
  const contentMatch = svgCode.match(/<svg[^>]*>([\s\S]*)<\/svg>/);
  const svgContent = contentMatch ? contentMatch[1] : '';

  let processedContent = svgContent
    .replace(/[-:]([a-z]+)(?=(-|=))/g, (_, a) => `${camelCase(a)}`)
    .replace(
      /<div[^>]*xmlns="http:\/\/www.w3.org\/1999\/xhtml"[^>]*>/g,
      '<div>',
    );

  processedContent = processedContent.replace(
    /style="([^"]+)"/g,
    (match, styleString) => {
      const styleObj = parseStyle(styleString);
      return `style={${JSON.stringify(styleObj)}}`;
    },
  );

  return `import React from 'react';
            import classnames from 'classnames';
            import { IconProps } from '../constant';

            const ${componentName} = ({ disabled, hoverable, active, size, color, className, style, ...restProps }: IconProps) => (
                <span
                    {...restProps}
                    style={{ fontSize: typeof size === 'number' ? \`\${size}px\` : size, color, ...style }}
                    className={classnames('dtstack-icon', className, {
                        'dtstack-icon--disabled': disabled,
                        'dtstack-icon--hoverable': hoverable,
                        'dtstack-icon--active': active,
                    })}
                >
                    <svg
                        width="1em"
                        height="1em"
                        xmlns="http://www.w3.org/2000/svg"
                        viewBox="0 0 64 64"
                        ${getSvgProps(iconType)}
                    >
                        ${processedContent}
                    </svg>
                </span>
            )

            ${componentName}.displayName = '${componentName}';

            export default ${componentName};
        `;
};
const convertSvgToReact = (filePath) => {
const fileName = path.basename(filePath, '.svg');
const componentName = fileName.replace(/[-_]([a-z])/g, (_, letter) =>
letter.toUpperCase(),
);
const iconType = getIconType(fileName);
const outputPath = path.join(OUTPUT_DIR, `${componentName}.tsx | pure`);
try {
let svgCode = fs.readFileSync(filePath, 'utf8');
// 先用 SVGO 优化
svgCode = optimizeSvg(svgCode, iconType);
// 转换为 React 组件
const componentCode = convertToReactComponent(
svgCode,
componentName,
iconType,
);
// 写入文件
fs.writeFileSync(outputPath, componentCode);
console.log(`✅ Generated: ${componentName} (${iconType})`);
return componentName;
} catch (error) {
console.error(`❌ Error converting ${fileName}:`, error);
}
};完成 React 代码转换之后,需要集体导出 svgReact 代码
const convertToIndex = async (componentNames) => {
  const exportString = componentNames.reduce((res, componentName) => {
    res += `export { default as ${componentName} } from './icons/${componentName}';\r\n`;
    return res;
  }, `import './index.css';\r\n`);

  fs.writeFileSync(
    path.join(ROOT_DIR, 'src', 'index.ts'),
    exportString,
    'utf-8',
  );
};
3.3 执行 build 完成 publish
完成 icon 仓库的打包已经 npm publish,tag 推到远程仓库
website 部署完成
3.4 所有的 PipeLine 运行完毕之后会执行将代码合并到 main 分支
总结
以上已经完成了 Figma Icon 到 npm 包的全部内容